When most of us think about what an effective ab workout should look and feel like, we imagine it will leave that outer layer of core muscles burning, with a heap of ab exercises like crunches, sit-ups, planks or leg raises.
But when we talk about your core, strengthening that front layer (aka what we think of as a six-pack) is only scratching the surface when it comes to well-rounded core training. Your deep core muscles, although not as visible, deserve just as much attention.
Here we break down what we even mean by deep core muscles, why you should never neglect training this part of your body, and some of the best exercises to start building your strength today.
What are your deep core muscles?
Your deep core muscles are the deep stabiliser muscles that do the essential work of supporting your spine, posture, internal organs and pelvis as you move through your day and workouts. When you take the time to strengthen your deep core muscles, you reduce your risk of back pain or injury, as well as improving your posture, balance, breathing and overall performance. Your deep core muscles also play an important role in supporting your body during pregnancy and postpartum recovery.
We’re talking about muscles like:
-
Transverse abdominis (TVA): This is your deepest abdominal muscle and it can help to visualise it as your body’s natural corset, belt or internal brace that wraps horizontally around your torso like a wide belt. This muscle keeps your body stable and supports your spine as you move and lift things, while also reducing strain on your lower back and helping with breathing.
-
Diaphragm: Speaking of breathing, this is the large, dome-shaped muscle below your lungs and it plays an essential role in breathing – contracting and moving downward when you inhale to allow your lungs to expand and fill with air, then relaxing and moving up as you exhale to help push the air out of your lungs.
-
Internal obliques: We often talk about training your obliques (the muscles you can feel engaged on the sides of your abs when you do a side plank). but you also have deeper internal oblique muscles that help with trunk rotation and lateral movements.
-
Multifidus: This is a small muscle that runs along your spine, helping to stabilise it and assisting with twisting and bending movements.
-
Pelvic floor: Yes, your deep core muscles do go this far down! We focus so much on training our “abs” but you wouldn’t be able to happily move through your daily life without the muscles that support organs like your bladder, bowel, small intestine and uterus.
8 of the best deep core exercises
If you’re used to targeting those “six-pack” core muscles with exercises like crunches, focusing on your deep core can take a bit of practice to build that mind-body connection and get a solid sense of what it feels like to engage and strengthen those muscles.
Core strengthening can also be a challenge at any stage in your postpartum journey, which is why we love Britany Williams’ Post-Pregnancy Core & Restore program as it’s designed to help you confidently rebuild your core foundation.
These types of exercises can be done as a standalone core session or incorporated into another workout, but however you’re doing them, remember to take your time and focus on breathing steadily. Move slowly and with control to get the most out of each rep – aiming for 8-15 reps per side is a great range depending on your current level of strength.
Dead bug
-
Lie flat on your back on a mat.
-
Bend your knees to 90 degrees and lift your legs so your shins are parallel to the floor in tabletop position.
-
Raise your arms straight up toward the ceiling, wrists aligned over your shoulders and your palms facing towards your feet.
-
Engage your core by thinking about pressing your lower back into the floor, then slowly extend your right arm overhead and your left leg straight out in front of you, just above the floor, without letting your back arch off the mat. Keep that core engaged.
-
Pause briefly in the fully extended position, then return to the starting position.
-
Repeat on the opposite side, extending your left arm and right leg this time, then continue alternating between your left and right sides.
40 seconds
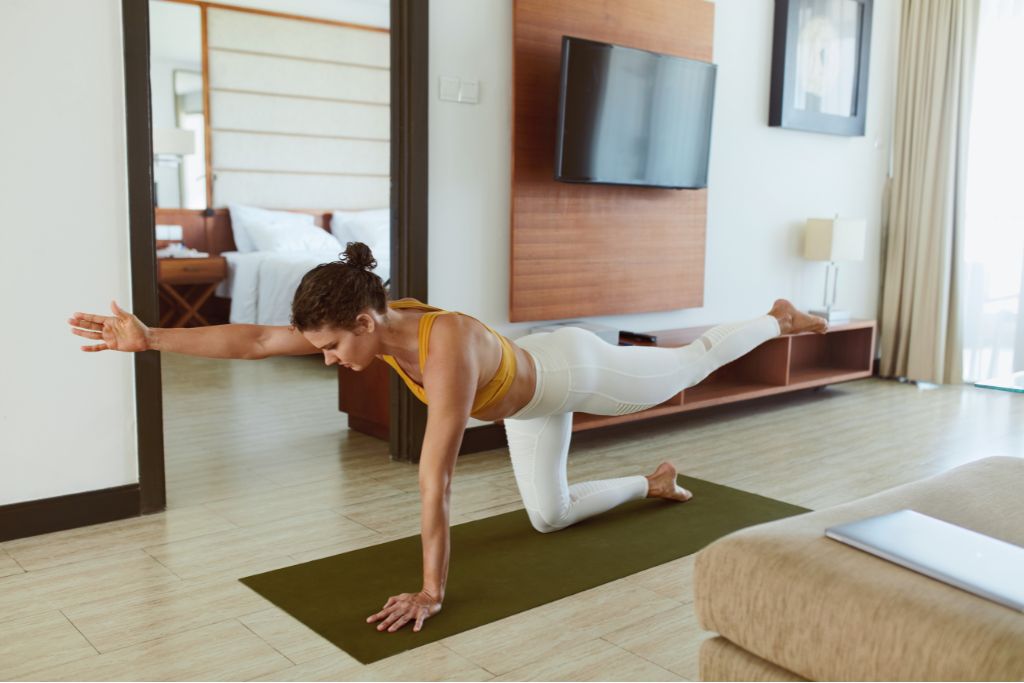
Bird Dog
-
Start on all fours in a tabletop position with your shoulders stacked over wrists, hips over knees.
-
Keep your spine neutral with your neck in line with your spine, and engage your core by thinking about drawing your belly button towards your spine.
-
Extend your right arm straight in front of you and your left leg straight behind you at the same time, keeping your hips level while avoiding arching your back or twisting your torso.
-
Pause briefly at the top, squeezing your glutes and keeping your core tight.
-
Slowly return to the starting position.
-
Repeat on the opposite side, extending your left arm and right leg, and then continue alternating between sides.
Ball rollouts
-
Place both forearms on the fitball directly in front of your chest, feet together on the mat behind you while resting on the balls of your feet. This is your starting position.
-
While maintaining a straight back and stabilising through your abdominals, lean forwards and allow the fitball to roll forwards, extending your arms out in front of you. Ensure that you only roll as far as you can while still maintaining your core and spinal alignment, to avoid placing excessive load on your lower back.
-
Using your abdominals, pull the fitball backwards to return to the starting position.
-
Repeat.
Glute Bridge March
-
Lie on your back with your knees bent and feet flat on the floor, hip-width apart. Let your arms rest by your sides, palms down.
-
Engage your core and squeeze your glutes to lift your hips off the floor, creating a straight line from your shoulders to your knees.
-
While keeping your hips lifted and stable, lift your right foot off the ground, bringing your knee toward your chest.
-
Lower it back down with control.
-
Repeat with the left leg, maintaining steady hips throughout the movement. Continue to repeat, alternating sides.
30 SECS (15 PER SIDE)
Side plank
-
Start by lying lengthways along a yoga mat. Place your left forearm firmly on the floor, ensuring that your elbow is directly below your shoulder and that your forearm is parallel to the short edge of your mat.
-
Extend both legs and, using your obliques, gently raise your hips off the mat. Position your feet one on top of each other or place your left foot on the mat in front of your right — whichever is most comfortable. Hold this position for 30-60 seconds (or as long as you can!) before completing the same amount of time on the other side.
Pallof press
-
Stand with your feet shoulder-width apart, perpendicular to a cable machine or a resistance band looped around a squat rack (the anchor point should be at chest height).
-
Hold the band or cable handle with both hands at your chest, elbows bent.
-
Step away from the anchor point until there is tension on the band or cable, and engage your core. Your body should face forward, resisting the pull from the side.
-
Press your hands straight out in front of your chest until your arms are fully extended.
-
Hold for 1–2 seconds, feeling the pull of resistance.
-
Slowly bring your hands back to your chest.
-
Complete all reps, then switch sides to work the other side of your core.
Bear crawl
-
Starting on all fours on a yoga mat, ensure that your knees are below your hips and your hands are below your shoulders. Set your spine in a neutral position and draw your shoulder blades down and back. Tuck your toes and lift your knees off the mat, resting on the balls of your feet. This is your starting position.
-
Take a small step forward with your left foot and right hand at the same time, ensuring that you keep your abdominals engaged to help minimise torso movement and that your torso remains parallel to the floor.
-
Take a small step forward with your right foot and left hand at the same time.
-
Continue alternating between left and right as you move forward, trying to keep your torso as steady as possible.
Flutter kicks
-
Start by lying on your back on a yoga mat. Engage your abdominal muscles by drawing your belly button in towards your spine and raise both legs off the floor. This is your starting position.
-
Start to gently kick your legs up and down, alternating sides like you’re swimming, ensuring that neither of your legs touch the floor.
-
Continue alternating between right and left sides, breathing steadily throughout.
Work out anywhere, anytime with YogaFokus
Ready for your first workout?
Dig deep to move strong
Building a strong core isn’t just about aesthetics, it’ll help you move well and feel well for years to come, whether you’re lifting groceries, luggage, children, or heavy weights.